PayU - Merchant Panel User Manual

Log In

Log in into your PayU account

To log in into your PayU account you just need to add your username (either your email or username), add your password, and click the 'Login' button.

Recover password

In case you forget your password, first click the link below 'Login' that says
'I forgot my password'.

This will lead you to a page where you type your user or email and click on 'Recover password'.

You will receive an email with a link. Just follow it!

User Management

Add User

In case you need more than one user, it is easy to create new users to manage your account.

First, click the 'Settings' button in the top bar. A drop-drown menu will display where you will choose 'User Management'.

After that, you will get to the User Management panel where you can see all the users that are available.

Next to the 'Edit User' button there is the 'Add User' button. Click on it.

Now, in the 'Add user' page you will fill in the basic information, add permissions, status and preferences.

First, you need to assign either an email or username to the new user. The password instructions will be sent via email.

Then, you'll need to provide the full name of the user.

You can allow the new user access to any of the accounts you manage, and set individual permissions for each account. Choose either one of the preset profiles or any of your personalized profiles.

The preferences that can be personalized are the following:

  • You can set a different date format according to your country usage.
  • You can set the time zone for the user.
  • You can also set a currency format. Either commas or periods to separate thousands.
  • You can set your preferred language.
  • Search user

    Searching for users is necessary when there are too many, or you need to find one with a specific characteristic.

    First, click the 'Settings' button in the top bar. A drop-drown menu will display where you will choose 'User Management'.

    After that, you will get to the User Management panel where you can see all the users that are available.

    You will see the search box below the title. Click on 'Search' to see the available filters.

    Use the filters to get to the one you are looking for.

    You can use any and all filters. The available filters are:

  • Name
  • User
  • Status
  • Accounts
  • Profile

  • Select the filter and fill in the criteria. Then click the 'Search' button.

    Edit users (permissions and preferences)

    Users may be personalized depending on the level of access you need to give them. They may also have custom preferences.

    First, click the 'Settings' button in the top bar. A drop-drown menu will display where you will choose 'User management'.

    After that, you will get to the User Management panel where you can see all the users that are available.

    For each account you can give the user a different level of access. You can use the preset profiles or create a personalized profile.

    Select the user you want to edit and click the 'Edit user' button.

    You will get to the Edit user page where you can edit the User information, Permissions, Status (active or inactive) and Preferences.


    The preferences that can be personalized are the following:

  • You can set a different date format according to your country usage.
  • You can set the time zone for the user.
  • You can also set a currency format. Either commas or periods to separate thousands.
  • You can set your preferred language.
  • Create personalized profiles

    Besides some basic setups for users we already created for you, it is possible to create new types of users.

    First, click the 'Settings' button in the top bar. A drop-drown menu will display where you choose 'Permissions and profiles'.

    You will get to the Profiles and permissions management panel.

    The default profiles are 'Read and Write' (MANAGER), 'administrator' (ADMIN), and 'only read' (CONSULT).

    To create a new profile click the 'Create personalized profile' button.

    Each personalized profile may have access to any of your accounts, or even all of the accounts with an individual setup of permissions.

    You need to give the profile a name and click the tick to save the name

    Then select at least one option (permission) for the system to let you save your settings.

    You will find the save settings button below the list of accounts.

    Delete and edit of personalized profiles

    Once a personalized user is created, it can be deleted or edited if you need so.

    First, click the 'Settings' button in the top bar. A drop-drown menu will display where you will choose 'Permissions and profiles'.

    Click the profile name that you want to delete or edit, and you will be given two options: 'Change name' or 'Remove'.

    To change the name of the profile click on 'Change name'. Type the new name and accept.

    If you want to delete a profile, click the 'Remove' option. Please be careful, the 'Remove' option doesn’t ask for a confirmation and cannot be undone.

    If you need to change the permissions of a profile select/unselect the buttons and save changes with the 'Save settings' button.

    Sales Report

    Under the Transactions category in the left column bar, you can find your 'Sales report'.

    You will see a search box, a sales summary, a sales graph, and a list of your latest sales.

    Filters to search sales

    There are different ways to access the information about your sales.

    First, click the 'Transactions' category in the left column menu, and select the 'Sales report' label.

    Use the search bar above the graph to use the filters. You can choose between Reference, order, payer, value, status, or payment method.

    To search sales by date use the date box to the right. After you click it, a calendar will appear where you can select a 'start' and an 'end' date. Then click 'Accept'.

    Sales summary

    First, click the 'Transactions' category in the left column menu, and click the 'Sales report' label.

    Below the search bar you can find 3 boxes with data about your sales (paid, pending and not paid). Each of them has a color indicator and a percentage from the total sales of the period selected in the calendar (the default is the last month). These are the key metrics you need to monitor to know how your business is running.

    If you hover the mouse over a bar in the 'Sales Graph', you can see the general details of that day using the same color indicator shown in the boxes.

    Rejection causes and the Approval rate

    First, click the ‘Transactions’ category in the left column menu, and select the 'Sales report' label.

    You can check the 'Approval rate' and the most frequent 'Rejection Causes' by clicking the tabs next to the 'Sales Chart'. The respective chart will appear.

    If you hover the mouse over one day of the graph in the 'Approval rate' tab, it will show the percentage of sales of that day over the period of time selected in the calendar (according to the number of approved sales in that same period of time).

    For the 'Rejection causes' tab, you have a table showing the 5 possible causes with a color indicator.

  • Not paid
  • Invalid
  • Mitigated fraud attempts
  • Bank rejection
  • Refund

  • If you hover the mouse over a bar in the 'Rejection causes' tab, you can see the rejection cases of that day, according to the same color indicator.

    Download the Sales Report into a .csv file

    First, click the 'Transactions' category in the left column menu, and select the 'Sales report' label.

    Below the 'Sales Graph', you can see the list of your latest sales. In order to download the sales report into a .csv file you have two options. There is a download button above and below that list of sales.

    After you press either button, you will be asked to choose a destination folder for the .csv file.

    Details about sales values

    First, click the 'Transactions' category in the left column menu, and select the 'Sales report' label.

    Below the 'Sales Graph', you can see the list of your latest sales.

    You can click anywhere in the row of any sale to open the order´s datasheet. A panel will appear from the right side, with the basic information related to that sale. Click on 'See detail' to see further details.

    Detailed view of related commissions, taxes and costs to that sale will appear.

    Making a refund of a paid sale

    When you need to make a refund from a paid sale, you first need to go to the 'Sales Report' label and find the specific sale you need.

    First, click the 'Transactions' category in the left column menu, and select the 'Sales report' label.

    Below the 'Sales Graph', you can see the list of your latest sales.

    You can click anywhere in the row of any sale to open the order´s datasheet. A panel will appear from the right side, with the basic details of the sale. Click the 'Refund' button.

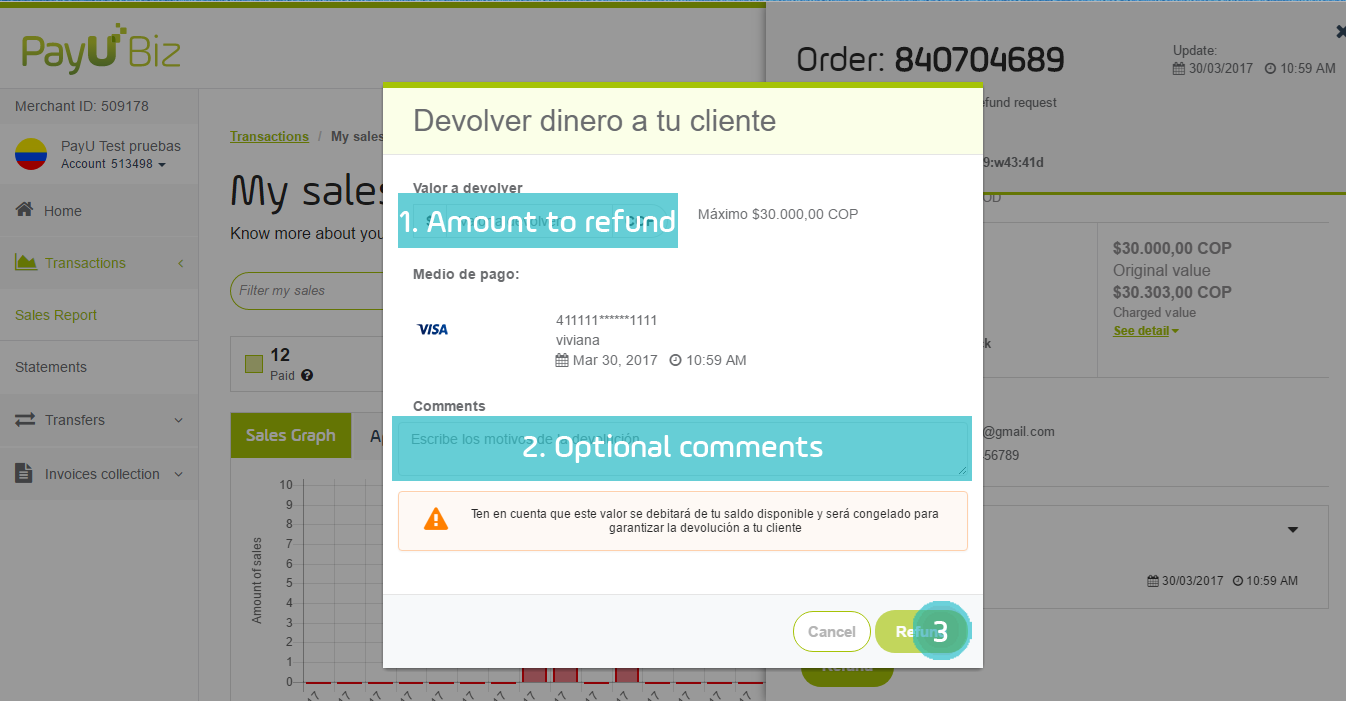
    A pop up will appear asking you for specific information such as the amount to refund and the payment method. You can include comments in a box below. Click the 'Refund' button.

    Statements

    First, click the 'Transactions' category in the left column menu, and select the 'Statements' label.

    Use filters to search your Statements Balance

    First, click the 'Transactions' category in the left column menu, and select the 'Statements' label.

    Use the search bar above the graph to use the filters.

    You can choose between movement ID, movement type (transaction, bank order and PayU order), reference, payment method, bank account number and bank. Click the 'Search' button.

    To search sales by date use the date box to the right.

    After you click it, a calendar will appear where you can select a 'start' and a 'end' date.

    Cost distribution: PayU fees, taxes, and transaction costs

    Every sale has a few other costs besides our fee, including taxes and transaction related costs.

    First, click the 'Transactions' category in the left column menu, and select the 'Statements' label.

    In the pie chart included next to the graph showing your sales, you can see how the related costs are distributed.

    If you get your mouse cursor over any of the slices of the pie chart, you can see the amount and percentage of each of these charges.

    Download different types of balances

    First, click the 'Transactions' category in the left column menu, and select the 'Statements' label.

    Below the sales chart and pie chart you can find a download button.

    You may download your balance using one of these three options:

  • Accounting balance
  • Balance
  • Old secure balance
  • After you press the button, you will be asked to choose a destination folder for the .csv file.